Student Computing Clusters
New Media Station Documentation - Importing from VHS
Capturing from a DV camcorder is the easiest way to get video into iMovie for editing. iMovie should be able to control your DV camcorder when it is connected to the computer through Firewire. You will also get better quality starting with DV source material than from VHS or other analog format. Remember that digital video files are big and that importing video takes as long as the duration of the video itself. If you have to capture a half-hour long video, it will take 30 minutes to play the tape from start to end and import it.
Import Process
Open iMovie. You will be automatically asked if you want to create a new project or open an existing one.

If you are continuing work on a project, select Open Existing Project and use the file dialog to locate your saved project.
If you are starting a new project, click Create Project and proceed through the following steps to save your project to the local computer. Important: Do not just accept the defaults and click Save or press Return. The default choice will save your project to your network home directory which will not have enough space to create an iMovie project. iMovie will crash, and you will have problems with your e-mail and other uses of your account!
- Click the down arrow to the right of the Save As: field in the Save sheet that appears. This will expand the Save sheet to give more options.
- Navigate to the /Temporary Storage folder on the hard drive. To do so, select the local hard drive named System in the column at the far left. Then, select the Temporary Storage folder.
- At this point, enter the name of your project in the Save As: field and click the Save button.


Your project is now saved on the local hard drive of the computer you are using. Note that you will have to return to this specific computer if you stop work on your project and wish to resume at a later date. Only this one machine has your files!
- Insert your tape into your DV camera.
- Switch the camcorder to VTR or playback mode.
- Connect your DV camcorder to the computer using the Firewire cable provided. Your camcorder most likely has a small 4-pin Firewire or iLink labelled connector. We have a 6-pin (the computer end) to 4-pin (the camcorder end) cable located at each workstation. Make sure that both ends are connected securely.
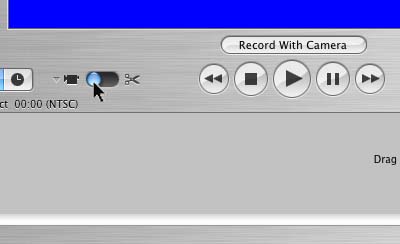
- Put iMovie into Camera Mode using the Camera mode/Edit mode toggle switch below the iMovie monitor.
- If necessary, select your camera from the pop-up menu of available cameras instead of the Miglia Director's Cut Take2 box. You should now see a blue screen with the message Camera Detected. If not, make sure that the camcorder is connected to the computer, is on, and is in playback or VTR mode.
- Click the Play button in iMovie. You should see the display from
the camera in the iMovie monitor.
iMovie will control the camcorder's using the buttons on screen to Rewind, Stop, Play, Pause, and Fast Forward. Use these to located the beginning of your material using the iMovie monitor as a display.
- When the tape is cued properly, click the Import button below the iMovie monitor in iMovie to start capturing. Start importing a few seconds before the actual beginning of your material for the best results. The extra can be edited out later.
- Control the importing process using the Import button. Click it again to stop importing. Note that your tape will keep playing. If you click Import again, it will create a new clip in the Clips pane at the right. iMovie will automatically detect new scenes, as defined by times when you stoped and restarted recording with the camcorder, and will create a new clip in the Clips pane for each new scene.
- When finished, click the Stop button, and switch iMovie to Edit mode.


More Information
For more information, see Apple's iMovie Tutorial Lesson 1: Getting Your Video into iMovie